


BRIDGE
Trump trouble
Andrew Robson
I AM often asked when it is correct to lead trumps. The common scenarios are: when the opponents are sacrificing and have few high cards — they are hoping to make tricks using their trumps separately; when you have a good holding in declarer's other bid suit — he will probably want to trump his losers in that suit in the dummy so you must extract dummy's trumps as soon as possible; and when you have broken hon- our combinations in all the other suits that make leading one of them too dangerous.
A trump lead was spectacularly success- ful on this week's deal.
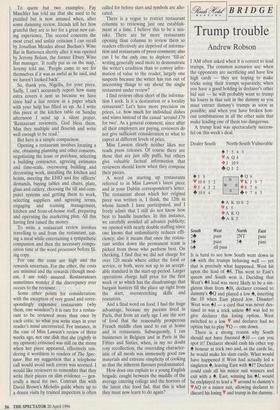
Dealer South North-South Vulnerable 47 5 4 3 A Q4
• J 109
4J 8 V 10 8
• 5 4 + 10 8 3 3 4 2 2 Q J 2
4 Q 6 V K J • 8 7 4 9 7
9 7 6 6 3
N
W E 4 A K 10 9 2 V6 5
• A K Q +A K5 South West North East 24 pass 2NT
pass
34 64 pass all pass 54
pass
It is hard to see how South went down in 64 with the trumps behaving well — yet that is precisely what happened. West hit upon the lead of 48. This went to East's queen and South won it. Deciding that West's 48 lead was more likely to be a sin- gleton than from 4J8, declarer crossed to dummy's 4Q and played a low 4, inserting the 10 when East played low. Disaster! West won 4J — a card that was never des- tined to win a trick unless 48 was led to give declarer this losing option. West switched to a low V and declarer had no option but to play ♦Q — one down.
There is a strong reason why South should not have finessed 410 — can you spot it? Declarer should cash his other top 4 honour at trick two and, as the cards lie, he would make his slam easily. What would have happened if West had actually led a singleton 4, leaving East with 4.1? Declarer could cash all his minor suit winners and exit with a 4. East, winning his 4J, would be endplayed to lead a ♦ around to dummy's VAC) or a minor suit, allowing declarer to discard his losing V and trump in the dummy.