SIMPSON'S
IN-THE-STRAND
SIMPSON'S
IN-THE-STRAND
CHESS
Gambits galore
Raymond Keene
DURING MUCH of the 19th century, the Evans Gambit was one of the great high- ways of chess theory. White sacrificed a pawn early on for murky complications and slashing attacks, and even the very best defenders succumbed to its perils. With the advent of the scientific school, though, the classical grandmasters of the early 20th century swiftly consigned the Evans, with its speculative sacrificial offers, to the dust- bin of theory. It was only in 1995 that Kasparov, in celebrated victories against Anand and Piket, demonstrated that the Evans might still retain some vigour.
A new book by the Internet and corre- spondence chess expert, Tim Harding, and Bernard Cafferty, former chess correspon- dent of the Sunday Times, brings the reader right up to date with all the latest develop- ments, as well as cataloguing in detail the heroic exploits of the 19th century. Inspired by Kasparov's example, I tried the Evans myself, and can warmly recommend it to enthusiasts who are happy to invest material in exchange for the initiative.
Raymond Keene—Derek Wanless: Exhibi- tion game, Simpson's-in-the-Strand, 1995.
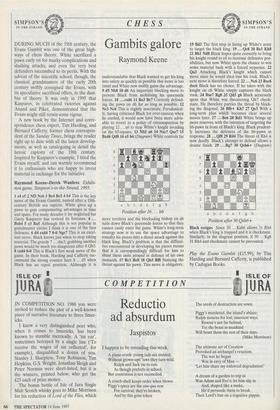
1 e4 e5 2 Nf3 Nc6 3 Bc4 Bc5 4 b4 This is the key move of the Evans Gambit, named after a 19th- century British sea captain. White gives up a pawn to gain compensating advantages in time and space. For many decades it lay neglected but Garry Kasparov has revived its fortunes. 4 ... Bxb4 5 c3 Ba5 Although this is not popular in grandmaster circles I think it is one of the best defences. 6 d4 exd4 7 0-0 Nge7 This is an excel- lent move. Black knows just when to stop taking material. The greedy 7 ... dxc3, grabbing another pawn would be much too dangerous after 8 Qb3. 8 cxd4 0-0 This is Black's first weak move of the game. In their book, Harding and Cafferty rec- ommend the strong counter here 8 ... d5 when Black has an equal position. Although it is understandable that Black wanted to get his king into safety as quickly as possible this move is too timid and White now swiftly gains the advantage. 9 d5 Nb8 10 d6 An important blocking move to prevent Black from mobilising his queenside forces. 10 ... cxd6 11 Ba3 Bc7 Correctly defend- ing the pawn on d6 for as long as possible. 12 Nc3 Nc6 This is slightly inaccurate. Paradoxical- ly, having criticised Black for over-caution when he castled, it would now have been more advis- able to revert to a policy of circumspection by playing 12 ... a6 to stop White's knight invading on the b5-square. 13 Nb5 a6 14 Nxc7 Qxc7 15 Bxd6 Qd8 16 e5 h6 (Diagram) White controls far
Position after 16 . . . h6 more territory and the blockading bishop on d6 nails down Black's queenside forces so that they cannot easily enter the game. White's long-term strategy now is to use the space advantage to transfer his pieces into a direct attack against the black king. Black's problem is that the difficul- ties encountered in developing his pieces means that it is correspondingly difficult for him to shunt these units around in defence of his own monarch. 17 Ra Re8 18 Qb3 Rf8 Noticing the threat against his pawn. This move is obligatory.
19 Bd3 The first step in lining up White's army to target the black king. 19 ...Qe8 20 Rel Kh8 21 Bbl Nd8 Black hopes quite correctly to bring his knight round to e6 to increase defensive pos- sibilities, but now White spots the chance to win some material back with a forced sequence. 22 Qa3 Attacking Black's knight which cannot move since he would then lose his rook. Black's next move is therefore forced. 22 ... Nc6 23 Rxc6 dxc6 Black has no choice. If he takes with the knight on c6 White simply captures the black rook. 24 Bxe7 Rg8 25 Qd3 g6 Black accurately spots that White was threatening Qh7 check- mate. He therefore parries the threat by block- ing the diagonal. 26 Bf6+ Kh7 27 Qe3 With a long-term plan which becomes clear several moves later. 27 ...Be6 28 Rdl White brings up more reserves, with the intention of targeting the h6-pawn in front of Black's king. Black prudent- ly increases the defences of the h6-pawn in response. 28 ... Qf8 29 Rd4 The threat of Rh4 is now deadly. Black's attempt to defend allows a drastic finish. 29 ...Rg7 30 Qxh6+ (Diagram)
Position after 30 Qxh6+
Black resigns Since 30 ... Kxh6 allows 31 Rh4 when Black's king is trapped and it is checkmate. Similarly, in the diagram position, if 30 ...Kg8 31 Rh4 and checkmate cannot be prevented.
Play the Evans Gambit (£15.99), by Tim Harding and Bernard Cafferty, is published by Cadogan Books.


 Previous page